Viser innlegg med etiketten Winter. Vis alle innlegg

onsdag 1. mars 2017

A simple winter scene card

Hello crafty peeps.
Ready for another month of challenges at the HOUSE of CARDS?

This month you can make a scene and/or colors.

Here is my inspirations card.


I kind of used both scene and color. I always struggle with those simple, one layer CAS cards. But I think I managed a simple one layer card at least :)

When I was emptying my boxes now, I found a chalk sett, that was some of the first thing I got when I started scrapping. I have not used it for years, but thought hmm.... way not... and I think i got the look i wanted.

The shape is just masked of with some tape. Tip is to fasten it to your jeans couple of times so it is not so sticky, and will not torn your paper. And I just need to find my fixative to fix the chalk to the card now, or you smudges it easily. ;)

Stampset from Impression Opsession, has this nice text I wanted to use together with the tree and the swing. Thers also a bird, and a tyre swing and another text too in this set. I stamped with Memento gray flannel, but should have used my Versafine as it give you a crisper finish.

I wanted snow since it still is very cold and lots of snow here still. So I used a glue pen and added some white snow glitter along the branches and at the ground.

Happy with my attempt for a simple one layer card.

Here is this months challenge graphic: 

Make a scene and/or colors.


Hope to see your creations in the challenge.
Happy crafting


 (✿◠‿◠) Ma (Merethe)

torsdag 25. februar 2016

Hvitt vinter hus med elektrisk telys inni

Hei igjen.

Her kommer et lite vinterhus og tre fra mæ. Huset er montert slik at det kan løftes opp og sette et elektrisk te lys inni.

Filen på huset og treet er funnet i Silhouette store og kuttet ut i hvit kartong med Portrait maskina mi. Pipa kjørte gjennom i en embossingfolder med mur struktur før den ble brettet og montert. Brukte så snemaling og glitter for en sne effekt.

Treet er kuttet ut flere ganger og brettet på midten og limt rygg mot rygg for å få en 3D effekt.

Plattformen er flere lag med eskepapp opppå hverandre og limt hvit kartong rundt før hus og tre ble montert på denne.

Liten gave te god venninne som liker det rent og enkelt.

Liker å bygge ting, og dette var koselig bygging. Terapi vil æ kalle det.
Ha en fin kreativ dag.


(✿◠‿◠)  Ma

Deltar i disse utfordringene:
29/2-16 Kort'O Mania - #147 Alt er lov BLE TOPP 3
29/2-16 Hjerteboden - Bretting
2/3-16 Simon says stamp - anything goes

tirsdag 1. desember 2015

Desember 2015 House of Cards Blog hop


Oh gosh, December already... have you been noty or nice... hihihi

Hello all you wonderfull cardmakers and crafting peeps.

Hope you all are in the Christmas mood, and will join us in this blog hop for the 


Here is my inspiration cards


I have used digis from our sponsors MHKDesigns and stamps from Great Impressions.

With the papers and brand new digi from MHKDesigns, I made this rosett card. Love makeing these and it worked well with this digi and worn pinkish paper. You know I love work with craft paper, so our inspiration photo for this bloghop was just a joy for me. Have used an egde punch Ek success, and die from Tonic studion and the Poinsettia are from retired Boss Cut.
Picked up the pink, white and craft, and some hits of gold on the poinsettia and some gold strings. The digi is colored with Distress markers and covered in ice glitter. 

You find this great digi here:MHKDesigns
 From Great Impressions I fell in love with this "dreamy" tree stamp and just had to have it.
And in my stash i found my old flock kit, and have not used it for agedes. So why not use that together with som gold glitter and and a glue pad. Flock is this velvet print on cards, and was super hot when I started makeing cards. Wanted them to have a simple and clean look. Do not have many English greetings, but found this in a set I had and used it here. 
As you know I am a sucker for snowflake, can't get to many of them, dies stamps punches... whatever as long theres some snowflake I am fine. So this to ended up in my basket. Did the same with this, like the other one. And both got a layer with gold glitter at the egde. Did not have any gold glitter paper. And yes I do have gold glitter all over my house. Even my dog is sparkling. 


Hope you found this all inspireing and want do do this fab bloghop. Enjoy hoppin.

Some detail photos


This hop will run FROM June 1ST AT 6:00 AM CST THROUGH June 15TH AT NOON CST, ANY CARD STYLE is welcome and we've got a gorgeous photo inspiration for your crafting enjoyment! 

You should have arrived here from Lisa's blog.

Here's our photo inspiration~


Here's your hop order~

You're here ----->Merethe<-----You're here

Now get to hoppin'! Your next stop is MICHELE

Don't forget to link up a project with us after completing the hop for an extra chance to win a mystery prize from one of our fabulous sponsors, too! 

HUGS and happy stamping to you all! :)

Prize: Choice of 1 digital stamp set and 1 paper pack

Prize: Prize package from store

Prize: TBA

Prize: Stamp Package

Thanks for playing along with this BlogHop at House of Cards

Ma (✿*‿*) HOC DT

Enter these challenges:
10/12-15 Scrappegrasjen - #17 JUL  
13/12-15 Scrappiness - #10 JUL 
15/12-15 Hobbygarasjen - #32 JUL
15/12-15 Kort'O Mania - #142 Glittrende Jul 
26/12-15 Kreativ Scrapping - #12 Alt er lov 
28/11- 15 Card and Scrap - #108 Alt er lov 
31/12-15 PapirPlaneten - #1 JUL  
31/12-15 Live and love crafts - #42 Sparkle  
31/12-15 Hjerteboden - JUL 
5/1-16 Papirlosjen - #12 Jul/Vinter 

søndag 1. november 2015

Stamped Punched window with a hidden object

Hi am back with another challenge at The House of Cards

This month it is a teqhnique challenge: Stamped punch window. And you know me I had to challenge my self on this. Did not know of this technique, but I looked it up after Mynn showed us. And there is a lot of tutorials on the Youtube and at Pintrest. I also found a lot of card with this hidden object, so I wanted to combine these. 

And here is my November card.


And when you open it, a new object shows in the cut out window.


And here you see how it slide inn the window pocket.


And here is howe the die cut fit rigth in the die cut window of the bulb.


I stamped and embossed and cut out all the bulbs and used a halographic embossingpowder. It gives a nice shine of the color as in the rainbow. 


The two bulbs in the front are mounted with thick foam tape to give some dimension. Used quilters rainbow colord tre to hang them in the pine branch. The pinebranch is punched out with a branch punch and put together. And used my white Wink of Stella brush.


The hanging on teh top of the bulbs I embossed in silver and fuzzy cut out, 


This was a fun card to make, and there is a load of tutorials and inspiration on both Youtube and Pintrest.

Here is what I have used: 
Spellbinder die set and stamps
Marha Punch pine branch
Distress ink Chipped Sapphire
Versamark ink
Ranger Holagraphic embossing powder
Whistler silver embossingpowder
Pattern paper from Inkido, sadly retired.
Div green scrapp paper
White crardboardl
Wink of Stella white.

Now your turn pop over to the challenge and see alle the other girls fab crations and hope you enter your own card in the challenges. 

Happy Crafting all you sweet paperlovers.

Hugs (✿*‿*) Ma


Entering these challenges
Scrappefryd FB - julekort
10/11-15 Scrappegrasjen - #16 Lag på Lag
13/11- 15 Card and Scrap - #106 Jul 
15/11-15 Kort'O Mania - #140 Bruk bare et mønsterpapir
26/11-15 Kreativ Scrapping - #11 Jul
30/11-15 Kreativ Hobby - November JUL 

mandag 5. oktober 2015

Frosty, embossing og diser og første no-line coloring

Hei igjen ja!

Her går det unna for tia. Idag er det et lite julekort med Mr. Frosty fra Wee Stamp som ble fargelagt med Prisma blyantene mine på Kraft. Bestemte meg for å forsøke no-line fargelegging og det var gøy, og blir ikke siste gange. 

Blir bestandig så godt humør når æ tar fram boksen med alle julestemplene mine. 

Så itillegg har jeg brukt tekststempel fra Papirdesign og en helt ny dise derifra som jeg syntes kutta veldig bra. Og et ramme stempel fra Joy Crafts. 

Og masse embossingpulver har æ brukt, og om nån e i tvil, æ like å embosse. 

Her er kortet mitt.


Gla i å bruke kraft kartong når æ fargelegge og e mye inspirert av Wenche Wold og hennes fargelegginger på kraft. 


Blir nok å fargelegge mere med no-line teknikken med Prisma blyantene. Koste meg masse.


Og æ klarte selvfølgelig å velte boksen med spissesponet, sjøl om æ hadde plassert den langt inn på bordet for å unngå det.... Shit happens hehehe..


Den nye disen Julehilsen fra Papirdesign kuttet overraskende lett i kraft kartongen. Valgte å bruke den uten bakgrunnen her. Snyflakene disene huske æ ikkje kor e ifra. Alt kutta i kraft og embossa med hvit opace embossing pulver. Bruket Stampendious sitt chunky embossingpulver te snø og i hjørnen på et av lagene. Det hvite laget er embosset med det opace ebossingpulver ala Jennifer McGuire stil. 


Det ovale rammestemplet fra JoyCraft stemplet jeg over det ferdig farga motivet etter å ha brukt antistatiske pute først. Bruke Versamark og hvitt opace embossing pulver. Etter at dette var smeltet strødde jeg Chunky embossigpulver rundt om og varmet det fra undersiden ellers blåser det av. Monterte motivet med foam tape bak ramma for dybde, og stakk biter av snøflak litt her og der. Blå krystaller passa på dissan snyflakene.


Inni brukte jeg rammestemplet på den biten æ skar ut på forsiden og tekststemplet fra Papirdesign. De to siste snyflakene passa fin her. 


(✿*‿*) Ma


Deltar i disse utfordringene:
13/10- 15 Card and Scrap - #104 Bruk stempler BLE TOPP 3 :)
15/10-15 Kort'O Mania - #138 Lag på Lag 
26/10-15 Kreativ Scrapping - #10 Lag på Lag 
30/10-15 Cace-ing christmas - #30 (snowing and snowflake) WON "Santa SuPreme"

Ha en kreativ aften videre alle sammen.

Har faktisk klart å lage en liten Youtube video av denna :)

https://www.youtube.com/watch?v=CAyhsyllgLc

fredag 2. oktober 2015

My 1st Pocket Letter


Hello all you wonderful crafters.

Her is my firsth Pocket Letter ever. I did not think it was for me, but I really liked makeing this so I alredy have made and published that here on my blog. Textured Pocket Letter.

And I will make some more and swap with other crafting friends. So here we go.

Here is my Christmas themed Pocket Letter.


And here are some more photos of it.


I have used patternpapers from Swedish Pion, this years Christmas paper, and from Norwegian PapirDesging last years Christmas collection as the base in the pockets. 

I am so lucky to own this Boss Cut retired Poinsettia die and made one for the cover and one for the pocket. They are cut in white ColorCopy paper and inked up with to shades of reds and greens. And a glitter stone for the center. 

Here are some more details:


In the collection of the Pion Christmas paper ther was panels that fited the pockets just right.


Some embellishement added in those diffrent pockets


Diecut some Christmas greeting and embossed they with holograpich clear embossing powder and the snowflakes are punched out and used Wink of Stella clear brush on them and added a raindrop in the centre.

All the pocket are 3,5x2,5inch and here I cut out a pice of vellum and stamped with Versamark and embossed with white embossing powder. Made one extra that I fuzzcut around the oval and that I tucked in behind the the other. Punched out some branches out of green patternpaper leftovers. Used strong tape on the vellom and randomly placed them around the oval. Finished it off whit some snow paste. Here you can use gesso or white chalk ink or paint. Use what you have :) 
Here I have used a piece og clear binding cover to add the embellishment on. Smal drop of glue under those hearts from Storyteller, and wrapped the ribbon around. You can use any plastic you have from packaging, but it have to thick enough so i dont bend to much. I roundet all the corners with a corner punch. 


Those lovely panels from the pattern paper I wanted to do some more with and got I tip from another crafting friend. I applyed glue all over the panel (I use RX-glue from 3M) and addet clear glitter all over it and shaked off the acess powder. Inked the egdes with a red ink and ready to go in the pocket.. stuck som smalle embellishment together with it. 


Then I used my friends tip for adding ribbons and treads in the christmas color in the holes in the side of the pocket letter.


Hope you got inspired to make a pocket letter you too.
Take care and have fun crafting.

(✿*‿*) Ma

Enter these challenge:
4/10-15 Papirlosjen - #Monokromatisk
11/10-15 Scrappiness - #8 Blomster
10/10-15 Scrappegrasjen - #15 Gull, sølv, glitter eller bling
13/10- 15 Card and Scrap - #104 Bruk stempler
15/10-15 Hobbygarasjen - #30 Glitter 
25/10-15 Scrappehjerte - #14 GAVER - Jippi jeg VANT :)


tirsdag 1. september 2015

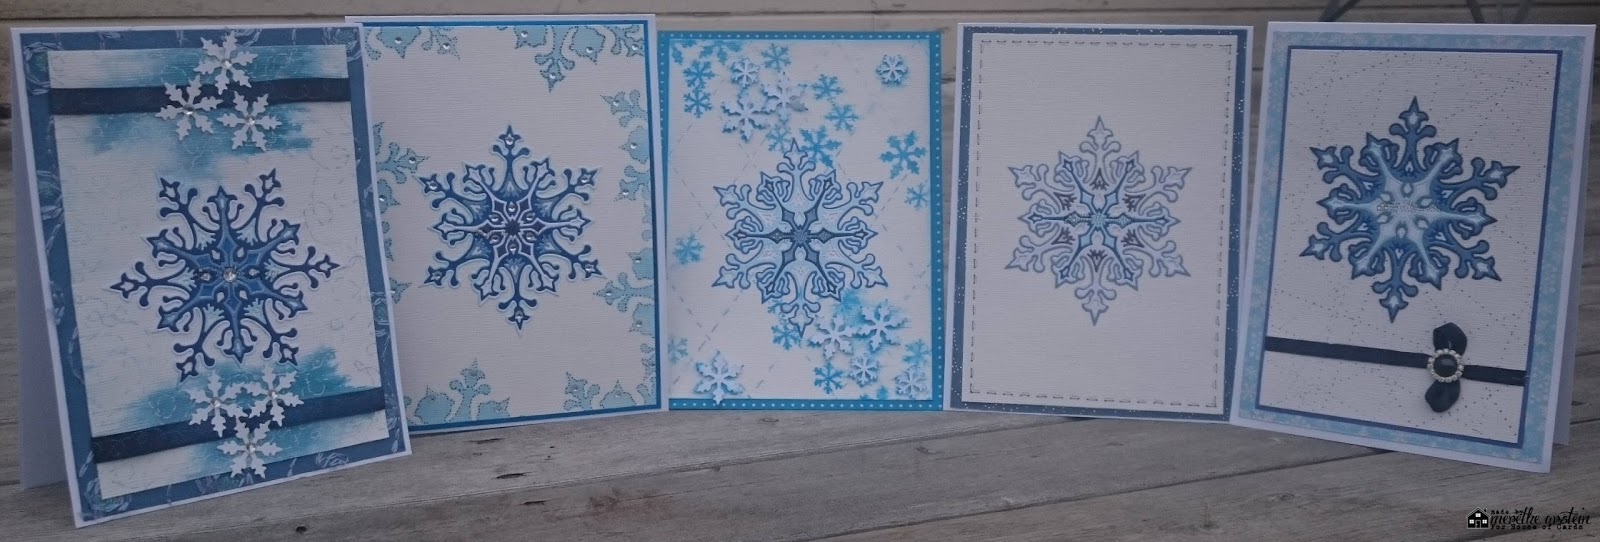
Snowflake and Faux Stitches

Hi every one.

Another challenges are due at the House of Cards, and this month you have to make a card with stitches real og faux.

I have used the faux one, and could not decide the one to use so I made 5 card, using faux stitches in different ways. 

So here they are.


The die have used is Large Snowflake from Impression Obsession, it is great for inlay work.
I have use diffrent leftovers i blue and white. And made the cardbase from ColorCopy paper 250gr.


Here I have used my TH marker and made line like inn a quilt, Tried to make a little batiq background and used a white Sakura gel pen in those area. I also had a ribbon with stitches in the same way and a paper with stitches on.


Here I used the negative space of the paper after diecutting the snowflake. Inked with TH distress ink and after just dotted line alonge the egdes with a TH marker


For this one I used my ruler and started with the line diagonaly from corner to corner, and made stitch line along both egdes and moved the ruler lined up with the last line. Did that in both directions. Used a TH marker. Stamped som snowflakes I punched out of foam and sprayed a little water. Did cut out some snowflakes i white paper edged and used clear Wink of Stella on them and layered them with foam tape. The bacground paper had a lot of holes and thoug they looked like stitches too.


When I started this I thought to make simple cards but that is a hard one for me. But managed to make this farly simple. Here a used a trasing wheel from may sewing stash. Did press hard so the diples was easy to se. Took a TH marker and made stitches between them. This is a way to easy make even stitches. I took a lighter color and frihand the line inside the first stitches.


For this one I also used my trasing wheel. Rolled it over my ink pad and lined it up with a ruler and rolled across the paper inn diffrent directions. When I was done i thought it was to plaine and picked up several blue TH markers and dotted the lines and I got the look I wanted. I recomend to do this before you glue your images to the paper.


So this is my cards for this months challenge, hope you enjoy them, and hope to see you card in the challenge.

Ma (✿*‿*) HOC DT

Enter these Challenges:
4/9-15 Papirlosjen - #Die cut eller Punch
25/9-15 Kreativ Scrapping - #9 Favoritter
25/9-15 Scrappehjerte - #13 Alt er love med dise